Monday, November 3, 2008

Paint Removal Part 1

Lemme see. The boat is 50 years old and has seen it's fair share of good days and bad days. It seems that the previous owner(s) opted to cover-up the bad days with layers of paint, six different colors to be exact.


I decided to go against my original chemical judgment and decided to try out the Jasco. I bought a gallon and applied it to the sides of the boat. I really like the product, you need to be very careful with it. I did my best not to touch it but when I did it chewed up my gloves. I need to invest in some really good rubber gloves if I use this stuff again.

It took about an hour for it to kick. I was able to remove 4 layers of paint with just a scraper. From what I can see, there are only 2 or 3 layers of paint left on the sides. I should be able to knock this down using 40 and 80 grit. The tough spots will come off with paint thinner.

I was very impressed with how well the Jasco handles old varnish. I applied a couple of layers to the transom and in about 30 minutes I was able to wipe it clean. Very nice. I am not trying to do a rush job on the boat, but this is just smarter than wearing out my arms for no good reason. Here are some before and after shots of the transom.

I will be back at it again next weekend. I am really enjoying the project and each time I am down there I am seeing progress.

Jill and I have been very busy. We recently welcomed a new addition to the family. A 5 month old Rhodesian Ridgeback / Mastiff mix named Lucy. She is great and she will soon become a fixture during boat work days. Jill and I are also competing in frostbite sailing at Chicago Yacht Club. Yesterday was a fun day on the water even though we busted our jib sheet.

Here is a picture I took of Lucy a week ago at the harbor.

Monday, October 13, 2008

Blank Canvas


Well, I am back at it. This was my first trip to the boat since May. I got down there mid-morning a started getting things done. I had set a couple of goals for myself for the day. Worked for about 5 hours.

1. Remove the remainder of the canvas deck.
2. Remove interior cockpit combing.
3. Remove another thousand staples.
4. Do a rough sanding of the deck.
5. Test paint and varnish removal to find what works.

I actually got all of those things done and was pretty happy with myself.

Removing the last of the canvas deck went pretty well. I had purchased a cheap plastic handled hunting knife back in May. The blade on it is very good for pulling the staples out one by one. Once you start you really can't stop until you have completed a side. Luckily the canvas was intact enough for me to use it to my benefit. I basically cut the canvas about 3 inches from the edge running down the length of the boat. Then pull a few staples out. I pull a little on the fabric then insert the knife behind the staple and twist while pulling the fabric outboard. The staples are a quarter inch apart so this is a process that gets repeated about a thousand times.

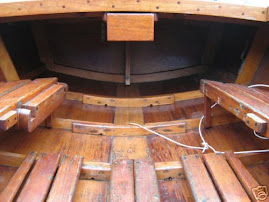
I got the outside edges of the boat staple and canvas free and then moved onto the task of removing the combing from the inside so that I could do more canvas /staple pulling. I thought to myself for a few minutes before tackling this part of the day. All of the fasteners I have pulled off of the boat have been brass. Brass is very soft stuff and can easily be stripped if not extremely careful. I had to drill out the dowel plugs before attempting to pull the screws. You have to be carefull not to go in to far otherwise you waste 10 minutes trying to dig or cut the screw out. There were 70 such plugs to drill. I only messed up one of these so kudos to me. After the combing is out you have to pull the rest of the canvas and staples. This is now done.

I took a short recess and had a couple of beers before firing up the sander. I just did a rough first pass sanding of the deck to remove any blemishes and crackled paint seepage. I could not feel any high/low spots in the entire deck, no cracking and no mold. Great!

I also tested out a couple of different sanding techniques and grades of paper. Seems that you need to use a minimum of 80 grit to get the varnish off of the interior bright work. I am trying to figure out the best method for removing it from tight areas. I do not want to use a chemical stripper of any kind because other people with Lightning's have had bad experiences with glued seems. I talked to a local boat chick on Sunday and she said that the heat gun should do the trick. I will try this out next time I am down there.

Yes, I bought a heat gun. There are about 10 layers of paint on the hull of the boat. I turned on the heat gun and within 5 minutes I had knocked off a square foot of paint straight down to the wood. I will probably buy another one and recruit a friend to help me remove all of the paint from the sides of the hull.

I know that there are some Wooden Lightning guys who read the blog so I have a question.

Which should I do first, flip and paint the hull, or put the canvas deck on?

I am thinking of sanding the sides of the boat and interior. Fit some deck hardware and cut holes where needed. Then apply Dr. Rot epoxy treatment, then primer. I would then put the canvas on and secure it. Then flip the boat and work on the bottom. Let me know if this is the wrong approach.

Friday, September 12, 2008

It's been a while

So,

Fall is almost here, well, at least in Chicago. Jill and I have had a crazy summer. In a couple of weeks we will resume work on the boat. As part of our research we are heading over to Michigan for the Bruce Goldsmith regatta. At last count there were 31 boats signed up.

Competing and sailing on Lightnings is an important part of the project. I have a ton of cool and good ideas for how I see rigging and finishing this boat most of which are derived from actually sailing on other boats, both new and old.

We will also be racing in Red Flannels Regatta here in Chicago next weekend.

I will post some pictures of this weekends racing.

Cheers,

Joshua Bone
6997

Thursday, July 10, 2008

Sorry I am a lazy ass.....


Many of you have been contacting me wondering how the project is coming along.

I purchased this boat keeping in mind that I had a very busy summer ahead of me. I really wanted this to just be a Fall/Winter/Spring project. Any work that has been done up to this point is really icing on the cake. I have done what I believe to be a fair assessment as to the condition of the boat. I have around 10 people who are volunteering themselves to help get the boat in good shape so when I factor the man hours that I estimated (300) multiplied by the Martincic Coefficient (2). Basically 600 hours. With 10 people it is 60 hours each or 5 full Saturdays per person. The winter in Chicago is long.

I am getting married in 15 days up on Mackinac Island. I will be competing in the Race to Mackinac on a Concordia 47 called Big Country. After this is said and done I will be heading to Sint. Maarten for the honeymoon.

The picture above is of me and my little lady along with best man Tim Shambrook doing the Mac last year on the Farr 40, Gravitas.

Once the rebuilding resumes I will be back to blogging after each stage.

Tuesday, May 27, 2008

Memorial Day = Sanding Day

I have not been as diligent with my posting as I hoped. But every time I do some work on the boat I do post, which basically means I haven't done much.

I have been busy getting ready for the wedding. Not complaining, but hoped I would have had a little more stuff done to the boat by this point.

The good news is that I have 10 people who are interested in helping out over the fall and winter.

Here is the short list of what I did over the weekend.

Sanded the floor boards that I removed from the boat, these are nearly finished. I will be doing the Dr. Rot treatment next week. I also got the rudder sanded on one side. There was a good amount of epoxy on there so it took a fair amount of time.

Sanding is not really that interesting so I am not going to post any pictures.

Sunday, May 4, 2008

Update

I have had no time to do any work on the boat this past week, but I have been in some research. It is amazing that so many people want to help out with this project.

I would like to thank Mr. Robert Astrove for his assistance in putting me in touch with so many fine Lightning people. I will going out the burbs this week to look at a wooden mast.

I plan on doing some sanding on the parts that we removed from the boat last week. They were a little damp and I really don't want to dig into removing varnish and attempting sanding until these items have dried.

A lot have people have given me some great ideas about the boat. I realize that I project like this needs a plan. The plan is still under developed but I will have a good vision ( and drawings) in place in the next few weeks. While my initial intention was to do a true restoration on the boat my mind is telling me differently. I will stay true to this era of boat building by utilizing techniques and materials that made early 20 century American craftsman and artisianship what they were, true beautiful works of art. Rest assured, I will not be putting an aluminum rig in this boat. I will sacrifice some performance for elegance.

My plan will include some modern rigging techniques and devices but will be hidden from plain view. This will give the crew a better racing advantage. I have been involved in doing complete rebuilds of Etchells and J24s and I really enjoy starting the rigging concept with a blank canvas (or veneered wooden deck). I also plan on getting out on the water for racing later in the summer. I do not have a ton of experience in the Lightning and this will be an important step in diagramming the setup.

Any of you out there have ideas are more than welcome to shoot me an email.
jbone@carltontechnologies.com

Sunday, April 27, 2008

Deconstruction: Part 1


April 26, 2008.

Yesterday was the first day of real boat work. Jill and I arrived at the boat around 11am. It was a beautiful day and we were glad the yard had not moved her inside. The sun was shining, wind was blowing and the Amtrack trains were coming into town. The yard where the boat is kept rests along a canal, and the only thing separating the yard from the water are two parallel steel tracks. This made for a rather noisy morning.

We unload some tools from the car and dove right into to taking 6997 apart. Jill spent some time taking the rub rails off, doing her best to keep them in one piece. I got to work on taking the interior seating, floor boards and ghetto patch jobs off the boat. Before, I started this little project I needed to pull all of the sails, rigging and junk out of the boat.

Here is the list of what came with the boat.

1 Cedar T- Boom
1 Wooden Spinnaker Pole in working condition
3 Spinnakers (1 solid black(no SN, 1 red and white (SN 9515), and 1 blue, grey and white(no SN))
1 Jib
1 Oar
1 Rotten cockpit cover
1 Full Mast-up Deck Cover
1 Mainsail (SN 6997)
1 Mainsail (SN 2555)


This was basically organized by throwing it on the boat trailer next to ours.

Now that I had something to work with I got started. I want to point out that this boat is incredibly well built. I was amazed at some of the joining work, the quality of the woods used and the complexity of the centerboard configuration. The boat is just beautiful. Yes, currently a red-headed step child, but beautiful nonetheless.

I started pulling screws and didn't stop for about an hour. When I was done, we were left with a bare interior. Jill and I spent around an hour removing all of the hardware from the deck. It is nice to have little person like her to crawl around under the deck while I turn the screwdriver.

During the day we probably had around 15 people come up and talk to us about the boat. Most would have these enormous smiles on their faces and some would shake their heads. We had a few from the Teddy Roosevelt days telling us about how the Lightning was the first boat they sailed, some so far in age that they could have been on their third marriage by the time this boat saw water for the first time.

I popped a couple of beers, hoping it would help nurse the hang-over from the night before. It did. Miller High Life is a great brew, and with their current marketing push, seemed fitting for this type of a project. Wendall would be proud.

Jill began the necessary process of vacuuming the water, leaves, twigs, sticks, pine cones, scratch off lotto tickets and miscellaneous muck out of the boat while I moved on to the deck challenge. This was by far the most difficult part of deconstruction.

The deck is all plywood that is covered with painted canvas. It is stretched out and then stapled to the hull/deck seam. What a pain in the ass. The staples were 3/4 inch stainless prong tacks and were only a 1/4 inch apart. Like I said, a pain in the ass. The bad news was that I had to pull these staples out. The good news is that I had to pull the staples out. If the deck were rotted they would have fallen out like a pair of loose dentures. I did my best to try to keep the staples attached to the canvas as I went down the edges to save myself time picking them up off the ground. I was able to attack the transom, and port/starboard sides all the way up the splash guard.


I felt like this was good days worth of work. We packed up everything that we removed from the boat. I am planning on working on the interior at home. Today I washed and dried the spinnakers. I need to wait for a sunny warm day to get the mainsail and jib cleaned up.

There are some really cool hardware pieces that we pulled off the boat. I hope you enjoy the blog.

Friday, April 25, 2008

The Story


Last week I took delivery of a 1958 Wooden Lightning, hull number 6997. Double planked cedar hull skin with Mahogany keel and interior. Traditional painted canvas deck.

The major issues with the boat will be worked out in the next year. Deck separation from hull near the port bow but not to the stem. The stem is chewed up from docking abuse. The canvas will need to be pulled off and replaced. I am contemplating removing the plywood deck and replacing it with cedar planking, but the plywood is not in bad shape. I am looking for a nice wooden mast and do not wish to bastardize her by going with an aluminum rig. The more I get her dissected the better idea I will have of her racing capabilities, otherwise she will be a very nice day sailer.

I will be working on the boat in my spare time. After this winter I realized that I needed a challenging project to keep myself busy. I have yet to start taking her apart and will begin this odyssey tomorrow.

The picture below captures the allure of this machine. Taken at White Rock Lake in 1955.